Showing posts with label hair. Show all posts
Sunday, January 8, 2017
Back2Black (eSalon Review)
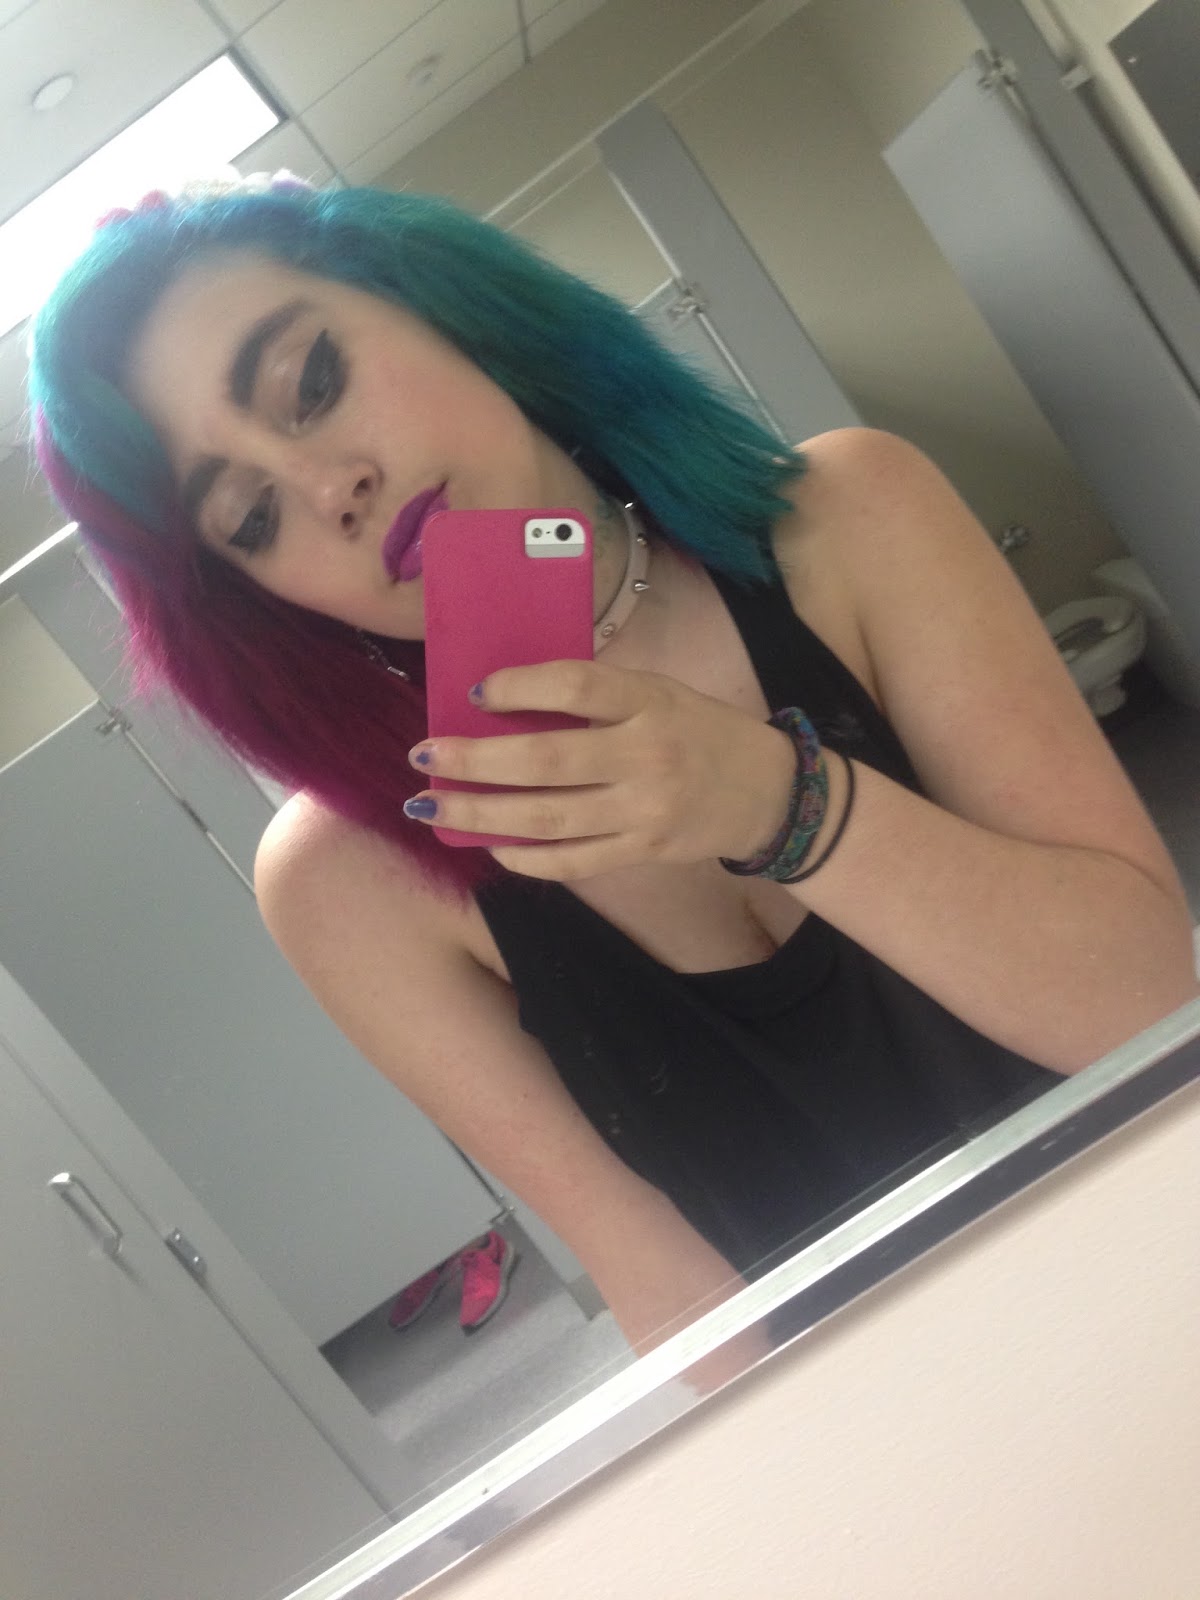
After chopping all my hair off over the summer, the possibilities were endless for my finally healthy hair. Ever since my ultimate flop at having blonde hair last year (and pretty much destroying it in the process), I had accepted that with the current backed up and colored state of my hair, having the platinum locks I wanted wasn't going to happen. However, now that about all my hair had never been colored, this was finally achievable. After a single (30 Vol.) bleach process, my hair was rather patchy and orange in some places, needing to be toned. I never got to that step though because after a month or so, I was pink. Though the bubblegum was a fun color for about a week or so, due to the orange tones in my hair, I ended up with an ugly fade after about two washes. With no possibility of going back to blonde and no desire for another crayola color, dying my hair black seemed like the ideal option.
Black is my fall back color for everything. Just like how a lot of my friends will shave their heads if they don't like their haircuts, if I ever fuck up my hair color, black is always there for me.
examples include:
-the ninth grade in which I let my friend dye my hair into a purple to blue to green ombre (why??? why???). After a solid hour of crying, I ended up with a blue black box dye.
-the tenth grade when I let the SAME friend (what was I thinking????) do a "color melt" (aka a plethora of neon shades randomly scattered around my head). Shoutout to Feria to that one.
So as I was not yet ready to go back to brown and wanted the pink as far away from me as possible, I was pretty hype to go back to my trusty shade. For those unaware, the first time I dyed my hair black, I regularly went to a salon, super pricey, and the second time, I used a box dye that did no favors for the appearance and health of my hair. Not wanting to repeat these mistakes, I instead went with my mother's recommendations to try out eSalon.
eSalon is an online service that claims to provide salon quality dye for a marginally cheaper price and more convenient home application. Having gone through many many many different brands of dye, all promising similar features, I was pretty skeptical. The setup of picking out your color is stupid-proof and admittedly kind of fun. After providing information on your hair type, length, and current color, a set of avaliable tones are shown for you to choose from, for the magical eSalon fairy stylists to mix for you- one thing I'd like to add is that I was pretty unimpressed by the options for black, having only one labeled "soft", and one labeled "blue". Having hated my black hair from sophomore year that featured purplish tones, I went for "soft".
The kit features: a developer, your custom color, a stain remover, stain guard, two pairs of gloves, shampoo, and conditioner which is pretty good for an at home hair kit. In the beginning, the dye was a little bit frustrating because it takes longer than most products I've used in the past to develop (and when it did, it turned a dark brownish color which made me quite nervous). Even after leaving it on for an hour, the color seemed rather brown, but after washing it out (WARNING: This stuff will take FOREVER to get out. I'm not kidding it seemed almost impossible), I was left with a beautiful, shiny, black!
Overall, I was pretty impressed by the quality of eSalon's dye, as it has left my hair in the same state health wise and the tone is just as promised. I'm especially a big fan of their custom color and the way they show you exactly what tones were used to mix it on their website and in your custom directions (complete with very cute illustrations)!
I also hit up their other service, The Match Up, that provides a similar custom-to-you feel through handpicking hair products on a subscription base, and would super recommend their color safe shampoo and tone corrector that takes the bronze hits out of your color as it begins to fade. Though I definitely have my critiques (developing, the amount of time it takes to wash out, and a slight bit of fading after a month), reasonably priced dye doesn't get much better than eSalon and I'm very content currently looking like the bitch from apt. 23.
Tuesday, July 5, 2016
My (Latest) Cosmetic Crushes
With the summer (pretty much) in full swing, I've taken to switching up the products I've been using all year and though I've definitely had some misses, here's a couple of the gems I've come across.
Labels:
beauty
,
cosmetic crush
,
hair
,
products
,
review
,
things i heart
Thursday, August 20, 2015
How To: Half and Half Purple and Pink Hair + Pravana Review
A couple weeks ago, I made a MAJOR splurge at Ricky's and picked up two tubes of Pravana hair dye: "Pink" and "Luscious Lavender". Though it was way more money than I ever spend on dye (or can afford to), I'd heard great things about Pravana so I couldn't help myself. Yesterday, I finally got around to using it and to be quite honest, I'm kind of disappointed in the way the colors showed up. First, they weren't even sticking to my skin which is always a major red flag. When on my extremely faded out hair, neither were showing up either. In the end, this was the results:
Both colors barely came out into my hair and that was even mixed with brighter shades of Adore and only a dash of conditioner. I'm really unsure why my results were so incredibly horrible but I'm going to stick to just Adore after this whole thing because not only is it cheaper, but I trust it more. The one good thing I have to say about this dye is the texture; it felt like conditioner and was really soft and had a good balance between thick and thin.
Anyways, after these disappointing results, I dyed my hair this morning! To do this, I used:
The process was like any- One bowl had a bit of the Pravana Pink left because I still wanted to have a little faith in it- sadly, the color just wasn't sticking to my hair so it was a lost cause, the main mix I used on the pink side was a large amount of Hot Pink with just a small amount of Pink Rose, the purple side was mainly Purple Rage with just two drops of Violet Gem. I parted my hair down the middle and went through all my hair with each color. What I mainly do when dyeing is take a large chunk of dye onto the brush and rub it into my hair like shampoo.
I was scared about the dye not showing up so I left it in for about an hour and then washed it out in freezing cold water with color protecting shampoo and hydrating conditioner. My hair is now super cute and I'm wildly happy with how it looks. The Purple Rage is gorgeous and oh my I'm so excited!!Thursday, August 6, 2015
Things I ♥: Hair Masques
*completely unsponsored (I'm too unpopular for this kind of sponsorship)*
Over the past couple months, the health of my hair has changed dramatically. Though my hair definitely was damaged beforehand, after going through multiple bleaching processes (don't even mention that one time I bleached it three times in one day), the state of my locks is definitely not awesome. Ever since I began home dyeing this year, I have created a pretty great Rolodex of DIY hair masques and cheap treatments (mainly from Ricky's) to help split ends and dry hair.
-DIY: putting your entire kitchen on your head
Though most of the treatment packets I buy are under $3, I sometimes become incredibly cheap (and also too lazy to make a Ricky's run), resulting in mixing about everything in the fridge together and putting it on top of my head. OK so yeah you could just grab everything and do that but items I recommend are: milk, eggs (just one yolk), honey, banana, vegetable oil, coconut milk, and mayo (I can't deal with the smell/consistency/existence of mayonnaise so that one is never an option for me). For semi-permanent dyed hair, I would recommend leaving out any oily products since it will fade the color- a few days before re-dyeing I will add the oils back in. Making and applying this masque is also crazy easy- simply mix everything you want into a bowl, section off your hair, and spread evenly.
Cost: Free! (unless you buy your own groceries...)
Time: 20 min.- whenever (I usually do it for 40 min but I have a friend who will leave it for hours)
-Not Your Mothers: Intensive Hair Unit Renewal Treatment
Not Your Mother's is one of my favorite brands ever for hair (their dry hair shampoo and anti- split end conditioner is the greatest) so when Sam and I found packets of their hair repair treatment I had to try it. The first time I used one, I'd just done a bleach bath and though it didn't feel marginally better, it was definitely good for just bleached. The application is simple (wash hair, massage with product, wait 3 min) my split ends were also pretty minimal afterwards and I could actually touch my hair without wanting to cringe!
Cost:
8 oz bottle- $8
1 packet (it took me 2 to cover my head)- $2
Time: 3-6 minutes
-Hask Keratin Protein Smoothing Deep Conditioner
I'd gone back to Ricky's a couple weeks later to grab a couple more Not Your Mother's packets and since it was a different location, they sadly didn't have them in stock so the next best thing was to try one of these. I've used this product twice now and it's super easy and quick to use (wash hair, leave in for 10-20 min, wash). I haven't risked blow drying afterwards but once my hair is completely dry, it feel so crazy soft and adds shine.
Cost: $3
Time: 10 min (I leave it for 20 just to make sure)
Monday, July 27, 2015
Things I ♥: Adore Hair Dye
![]() |
| "baby blue", "pink rose", "violet gem", "ruby red" |
Currently, the only dye I ever use is Adore. Though the color selection is not nearly as expansive as brands such as Manic Panic, I'm huge on long lasting colors and this dye is perfect (this may not apply to others since my hair creates basically no oils, so I only wash my hair once a week). I've only used around five colors (if you don't count mixing) on myself but have dyed other's hair with other shades ("Orange Blaze", "Purple Rage", "Hot Pink", etc) and not only do the colors come out about as bright as Manic Panic and Crazy Color but will last around 3X longer- it's wonderful. Also, being a broke, unemployed, teenager, price is a pretty big turning point for me. This shit is $5 (half as much as Arctic Fox, Manic Panic, etc). $5. And, about one and a half bottles will cover my entire head- have you seen how much hair I have??
I've never seen either of these reds alone but have mixed around a half a bottle of "Truly Red" with around a quarter of "Ruby Red" to create a more Ash Costello deep shade like what she's got now instead of the orangey color she had earlier. Overall, the color came out well and I was happy with it for about a week until I took a shower and it slightly faded (OK I did wash it with shampoo and warm water by accident)
and that was the downfall of all my red hair dreams. The problem with this color on hair is that red not only clashes with about EVERYTHING but also turns a gross brass-y color and is quick to fade due to the pigments. :(((((
My next color was this lovely shade! I had to Color Oops and bleach over this one and I was really impressed on how it took to one of my infamous bleach jobs. It was slightly patchy due to a not so well done mixing with a dash of "Pink Rose" but I was super crazy happy with this one- I'm actually thinking of going back to this color once my current one fades out.
![]() |
| (right) my hair after 3 weeks, (left) 2 weeks |
These two I used for the same hair "phase"
I've never done blue hair before so this one was pretty exciting- since I wanted this one to be a bit more pastel, I have been washing it with shampoo and regular temperature water. I've had it for two weeks now and the blue has turned teal in some spots and kind of mint colored (I'm so excited over that) whereas the pink has gotten a little less bright but still has barely faded.
![]() |
| (right) just done, (left) 2 weeks |
Saturday, July 25, 2015
How To: Change Hair Color With Minimal Bleaching
I haven't made a beauty post in forever- mainly because I kind of have lost interest in the whole "beauty blogger" gig but this is pretty relevant I guess so I'm just going to proceed on.
There's no doubt about it. My hair is damaged. Mainly from having an obsession with hair straightening that started off in 7th grade and has gone downhill from there but also partly from dyeing and bleaching my hair since the 5th grade. I had black hair for quite awhile which was a great lifesaver because it requires no bleach and also I barely ever had to re-dye it. Overall, a great decision and four month break. I of course got bored and basically destroyed all hair I had with excessive Ajax and baking soda treatments when the most efficient (and least damaging) thing was Color Oops. I then had an unfortunate incident with trying to go blonde and bleaching my hair three times in one day (REALLY bad idea) just to go back to black. Later on, I color oopsed one half of my hair and went Ash Costello using Adore Truly Red and Kaleidocolors bleach (it was an absolutely disgusting color and consistency- it also didn't work awesome and is about the same price as Clairol which is A+)
![]() |
| I basically had a constant soundtrack of "Death Of The Party" playing where ever I went |
It overall didn't kill my hair but definitely wasn't great for it. The red faded quickly though (I also couldn't wear any color aside from black with it) so I ended up color oops-ing the rest of my hair and also bleaching to go to a purplish-pink (using Adore Violet Gem mixed with a bit of Adore Pink Rose).
I've always wanted to do a half and half and Harper (the scene queen who dyes my hair) was leaving for camp soon so I took the opportunity and went half blue half pink because it reminded me of cotton candy. That is currently the hair I have on my head!!
Though one of my biggest problems with hair dye is fading incredibly fast (ex: my purple hair earlier in the year) but to get the blue in and the purple on one side out, this was quite the opposite. I tried about everything- Vitamin C (crush up tablets, mix them up with Head and Shoulders, put on hair and let soak), Over-washing with hot water and Head and Shoulders shampoo, and the worst of all, baking soda (NEVER do it- this treatment does just about the same damage as bleaching and by then it's just worth it to resort to bleach). It wasn't coming out. The purple had faded to kind of an orange tinted purple shade but it definitely wasn't enough to dye blue over and at that point, I was way too over excited for this color and didn't want to wait and do more treatments over the next month (if your hair is completely fried, just keep washing with Head and Shoulders and hot water and you'll be good in a few weeks) and I have a little bit of life left in my hair so I resorted to the bleach bath.
NOTE: a bleach bath is really the last resort- you don't want to do it unless you really can't wait like me or it REALLY isn't coming out (this mainly applies to darker blues)
A bleach bath isn't nearly as scary as it sounds- yes it will damage your hair because that's what bleach does but won't hurt it as much as a regular bleach process will. Basically, what you do is take any shampoo you've got (I recommend Head and Shoulders) and mix it with about a packet of bleach (I've got short hair but a TON of it and one worked just fine on me) and developer (really doesn't matter what volume- I used 40 because I'm an idiot and that's all I had)- there's no real ratio. Whatever feels right I guess. Then, apply to hair as you would with regular bleach. I mainly focused on the side I wanted to do blue but since I had some mixture left over and wanted to go a lighter pink, I put a bit of it on the other side too.
Even though I used to bleach my hair and used to have blonde bits all the time when I was younger, my locks are basically done with me at this point, their big "fuck you" to me is to never get to a decent blonde. This was surprisingly the only time in months I've gotten a good blonde!! This picture was taken because Sam thought the horrible bleach job on the pink side of my head was really funny but look how actually blonde it is!!
Since I was really worried about horrible damage on my hair (I'd bleached it fully a couple weeks before), I used two Not Your Mother's Intensive Hair Renewal Treatment packets I'd gotten from Ricky's the day before. Though my hair didn't feel better than before I'd done the bleach, it definitely wasn't as disgusting and unbearable to touch as last time. After letting my hair dry (no heat!!), Harper applied Adore Pink Rose on one side and Adore Baby Blue on the other. The final product was this cute thing:
I'm super duper happy to finally have half and half hair and feel like the emo Melanie Martinez. I'm real excited for it to start to fade and look a little more pastel-y- I've had it for a little over a week now and have taken around three showers using room temperature water and the blue has turned slightly teal which is pretty cool. Overall, I'm #livin #lovin life and my mom is questioning wether or not she wants to be seen in public with me.
Wednesday, October 8, 2014
My Favorite Products For Damaged Hair
As most of you may know, I am guilty dying my hair since about fifth grade along withe excessively straightening and using other heat products towards it. Though I'm not willing to give up my dye and straight hair, I have been taking pretty good hair of my tresses since they have become rather disgusting (trust me, you don't want to touch my hair) and I am aware they will never be perfectly healthy, I'm trying to grow it out and not go bald so that means I've collected quite a treasure trove of different hair care products that help me keep the dye and straightening while still preserving health in my locks.
♥Not Your Mother's "Beat The Heat Shield Spray"
(Target, Ulta, basically anywhere that sells hair products)
One of my favorite hair product brands in the whole world is Not Your Mother's for their products aren't only for girls with straight or mildly curly hair but are extremely versatile- my hair is three textures so I mean it when I say a product is awesome. I just started using this whenever I straighten my hair along with three other products (shown later in the post) and it has worked better than most of the other sprays I have tried out. Unlike any other heat protectant, this shield spray gives a better hold on the straightening and keeps it in for much longer than usual. It also helps that it smells super good.
♥It's A Ten "Miracle Leave In"
(Target, salons, etc)
Other than the shield spray, this is one of my all time favorite straightening (and heat in general) products. It's A Ten has an awesome texture that is more creamy than others and therefor provides a better and smoother straightening process. It also has keratin infused into it which is super good for your hair and is a much better alternative than spending hundreds of dollars on a keratin treatment.
♥Garnier "Sleek and Shine Flat Iron Perfecter"
(Target, etc)
Though I wasn't a huge fan of this spray at first, it does seem to do a pretty Ok job. When I use it, I'll first put my heat shield on first and then spray It's A Ten- this is probably because my hair is a stubborn bitch but I wouldn't recommend you using just this to straighten your hair. Though it isn't all that strong, this product does have a nice after shine that lasts about two days that is super nice and pretty.
♥Not Your Mothers "Clean Freak Refreshing Dry Shampoo"
(Target, etc)
Though I shower every day, I can't afford to wash my hair too so I usually end up only really cleaning my hair twice a week. Though I am super lucky my hair barely produces any oil, I still want it to be somewhat not so gross so this dry shampoo is a life saver. I've tried other products like this (such as Bastite which is a load of shit) and every other dry shampoo is all too flaky and sprays too much out whereas this doesn't leave any white spots nor does it flake and fall out whenever I touch my hair.
♥Bed Head "Control Freak" conditioner
Bed Head is one of my all time favorite brands for hair products and this shampoo is a lifesaver. It basically eliminates frizz when I wash it out and makes the straightening process quicker, and easier. One downside to it is that this conditioner has the worst smell ever but once you get past that, it's really lovely.
Wednesday, July 23, 2014
How To: Space Buns (For Short Hair)
Space buns are my go to hairstyle for any bad hair day since they are super cute while still making my hair less gross and so here is my quick tutorial for these adorable buns for girls with short hair like me.
Step One
I wear my hair at a side part to the left but for this, I have to middle part my hair which looks pretty ridiculous as you can see. If you have bangs or a fringe like me, I would recommend separating them from the rest of your hair and tying them in a ponytail in front of your face.
Step Two
Now that your hair is parted, separate it into two even pigtails. This now depends on high you want them. Since my hair is pretty short, I go for about a medium sized length. I usually start with the left side first and bring it up and make it into a bun. Now, just like the first side, do the next one.
Step Three
I usually don't get the buns perfectly on the first try (they are most likely uneven) so I play around with height and how tight the buns are (I sometimes like them kind of loose and messy).
Step Four
This part really depends on how long your hair is but since this is meant especially for girls with short hair, I usually have to put a thin headband and a few clips in just to get that extra hair that wasn't long enough to go into the buns (my hair is on an angle) out of there.
And that's it! I would love to see pictures of your lovely faces and how the buns turned out so feel free to send them to How Fitting's email (howfittingblog1@gmail.com)!
Wednesday, April 30, 2014
Beauty Product Reviews 2
This weekend, I ended up at Harmon and bought a couple new beauty products to try out!
Bastite Dry Shampoo: Cherry
I have tried tons of different hair sprays just to get my hair to have a bit more volume and not look as dried out and I have to say, Bastite is my overall favorite. Unlike a lot of other dry shampoos, it doesn't make my hair feel sticky or smell gross and really does the trick to get healthy looking (at least), silky, hair. I would definitely recommend it to anyone who is struggling with dry and straightened hair.
Maybelline Baby Skin Pore Eraser
I am rather obsessive over my foundation and "skin makeup" (I don't know what else to call it...) and have been looking for something for my pores so when I found the pore eraser, I decided "why not?". I can't exactly compare it to any other pore cosmetic since this is my first time using one but I love love love it. The name "Baby Skin" is a perfect way to describe it for not only does it make my pores much less obvious, but makes my face feel pretty great.
Maybelline Master Glaze Blush Stick: "Pinched Pink"
I have been using a Loreal blush for a couple months now and though I loved it, my foundation is extremely pale and the texture was so thick it was starting to look a little over done. I liked the idea of the stick for when I was applying blush with my finger, I would always take way too much and end up looking pretty stupid. The blush stick is pretty great for applying because I just swipe a bit across my cheeks, rub in, and then I'm done! The color is also perfect for it is a very subtle pink that doesn't make my entire face look to done up.
Rimmel Stay Matte
As I said earlier on, I have a pretty huge obsession with having a matte look to my makeup so when I found a foundation called "Stay Matte" I thought it was pretty perfect. The texture is a little thick though so I have to mix it with Loreal True Match which almost waters it down a bit so it doesn't look caked on.
Wednesday, April 2, 2014
Beauty Product Reviews
I have been trying out a lot of different beauty products and decided why not share them with you guys?
The first product I'm going to talk about is "Sleek and Shine Flat Iron Perfecter" by Garnier Fructis. This is supposed to protect your hair from heat damage and I decided to try it out for I was running low on "It's A Ten" and wasn't going to be going to the salon to get more for a couple weeks. I applied it to every layer of my hair before I straightened it and though it did what seemed like the job, it did make my hair feel a little sticky afterwards. I thought this flat iron protector was OK but I would like it if it would spray a less amount of liquid for I ended up with extremely sticky gross feeling hair for a couple minutes after straightening. Though this is a cheaper alternative for "It's A Ten", it doesn't do nearly as well.
The next hair product is also a heat protectant. My hair has been very unhealthy and damaged for the past couple months due to my excessive straightening and though "It's A Ten" is amazing, I needed something a little stronger so I tried out the "Intensive Hair Repair Masque" by Salon Grafix. To apply this, I took a shower first, and then spread it from my scalp to roots on all layers of my hair (which there are about a million of). I then combed my hair and waited fifteen minutes (you're supposed to wait 3-15 minutes depending on how much hair you have). I then rinsed the product out and I could immediately tell the difference. This made my hair feel much more soft and thin and I'd recommend this 100% to anyone with damaged hair.
Next, I tried out
"Evercurl Conditioner" by L'Oreal. As I said. my hair is extremely damaged from all the dying and heat I've put it through so I've been trying to cut down on the amount of times I straighten and blow dry it. To do so, I have been looking into ways of wearing my hair naturally without getting an Afro. It was somewhat OK though it smelled pretty gross and the bottle was driving me crazy for it only pumps out a bit at a time and I have a ton of hair so I needed a LOTS of it. I swear to God I spent more time wrestling with the bottle to get more out than actually washing my hair. Other than that, the final product was pretty good. My hair looks rather big but it's extremely soft (that might be from the hair repair though) and fluffy. I am not sure if I could ever wear this on a regular basis but it does look better than I expected. I think I'd recommend this to someone with longer hair for mine looks like a pretty fluffy afro right now.
Wow yet another flat iron hair product. Since my hair always looks a little dull after straightening, I decided why not try out "Quenched Mineral Moisture Shimmering Replenisher" by OGX? I am also going to confess at this point that I mostly deiced to go for it because the bottle was pretty. Last week when I straightened my hair, I tried it and the first thing I noticed was how disgusting it smelled. Other than the stench it gave off, it actually worked pretty well and made my just straightened hair much shinier and it ended up looking a lot healthier than it ever will be.
If any of you have ever seen my natural hair texture, you will know how insanely frizzy it can get. I have been using products such as Frizz Ease for years but I have come to not really like texture of it also it has started to make my hair feel quite greasy. I found "Garnier Fructis: Sleek Shine Anti Frizz Serum" at Walgreens a week ago and decided to test it out. The texture is a little thinner than Frizz Ease which was what I was looking for. It did make my hair feel a little greasy though I only used a bit.
My all time favorite type of lipstick are Clinique Chubby Sticks. I right now only have two (Voluptuous Violet and Super Strawberry) and have been looking into investing in another. When I was at Rite Aid last week, I did end up finding "Revlon Color Burst: Honey Douce". I was drawn to it for this lip balm has the same shape as the chubby stick containers. Though the chubby sticks obviously being better quality than a drug store lipstick, I say it did a pretty good job. The texture is about right and though it doesn't last as long as the Clinique, it didn't come off too quickly. The color was also real nice. What I was looking for was a more blush colored pink since all my other lipsticks are very intense and darker shaded but I like how there is a hint of fuchsia in it.
Ok Sally Hansen's "Mint Sorbet" is my new favorite nail color no doubt. Though I am absolute rubbish at doing my own fingernails, I love using this pastel nail polish.
Those were just some of the newest products I have been trying out over the past couple weeks. See you Friday!
Subscribe to:
Posts
(
Atom
)


